Build and deploy
From 2026.4 you build your addressables and deploy them to your worlds from a single window — the Addressables management window. There is no separate upload step: the same window builds the environment and deploys it into the worlds available to you.
The Addressables management window requires you to be logged in to your tenant. Follow Connect the Creator Kit to your tenant first — until then the Scene Configurations list stays empty.
Remember to setup your project first!
Open the window from the top bar: Reflectis Worlds → Creator Kit → Core → Addressables management.
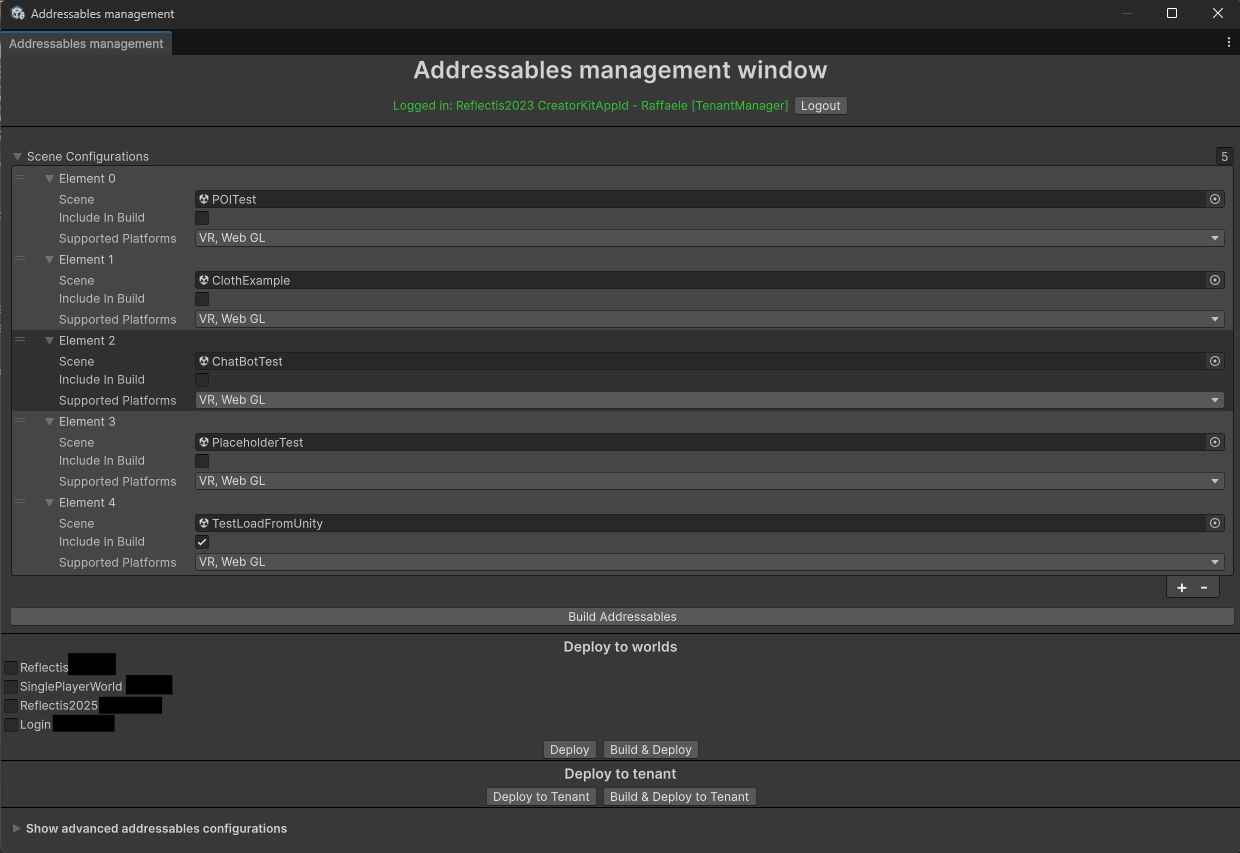
Configure the scenes
The Scene Configurations list shows each scene to build. For every scene you can set:
- Include In Build — whether the scene is part of the build.
- Supported Platforms — the platforms the scene targets (e.g. VR, WebGL), including the mobile target.
Use the + / − buttons to add or remove scenes from the list.
Build the addressables
Click Build Addressables to compile the scenes you included.
Manage configuration errors
The window warns you of any errors, such as project settings that have not been configured yet. When there are errors, a Fix Addressables configurations button appears in place of Build Addressables. Click it to apply the fixes; once the configuration is valid, the Build Addressables button comes back so you can complete the build.
Deploy to your worlds
Once you are logged in and the addressables are built, deploy straight from the same window:
- Deploy to worlds — tick the target worlds in the list, then click Deploy to push the already-built addressables, or Build & Deploy to build and push in a single step.
- Deploy to tenant — use Deploy to Tenant / Build & Deploy to Tenant to make the environment available at tenant level.
The name of the addressable scene gives the name to the uploaded environment. The visual name can still be edited in the Back Office Environment section after the upload.
After deploying, create the Experience that uses your environment: explore how Experiences work and follow the instructions to create a new one. If you don't see the Environments / Experiences menu items, you don't have the permissions to manage them — ask the Owner of the World for help.
If you can't deploy directly from Unity, the environment can still be uploaded manually — see Manual upload (legacy).